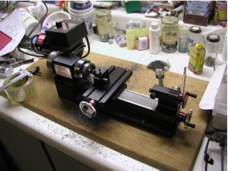
As an engineer, I've always been a bit interested in machining, and the process for building large engines. I finally got my chance last year when I bought myself a Sherline minitature lathe. I also found Kozo Hiraoka's books on building live steam locomotives. His books are great at describing how to build a live steam locomotive -- a model that actually boils steam and moves under its own power. I'd bought two of his books in order to learn more about machining, but slowly found myself building one.
Hiraoka's simplest book describes building a Pennsylvania A3 switcher -- a small, four driver locomotive. Most of the locomotive is brass, but steel, stainless steel, and copper are used in places. He builds the locomotive from simple metal shapes -- bar (round, square, and rectangular) and sheet. There is no need to make or buy castings (except for the driver wheels). The books are particularly great at describing how to machine the pieces -- how to use a lathe to turn the wheels, how to make identical holes in similar pieces, how to bend and shape metal sheet, and how to solder metal.
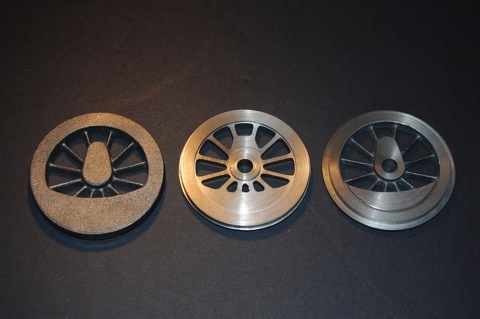
I started making the wheels for the tender, thinking I could use these for other projects. I used his instructions to turn two inch diameter, half inch thick discs into railroad wheels, and to put the wheels on axles. From there, I found myself building more and more from the book. I suspect I'm aiming to build the whole locomotive; we'll see how far I get.
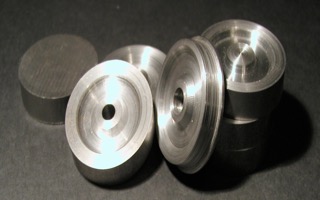
Progressive stages of wheels from raw disc, machined center, drilled axle hole, and finally machined rim.

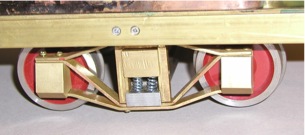
Finished tender truck (with caliper to show size). Finished and painted truck.
.
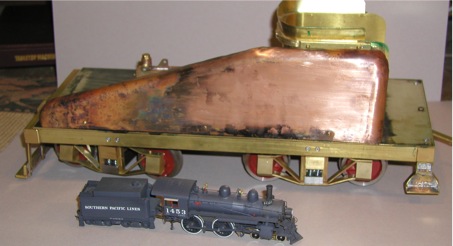
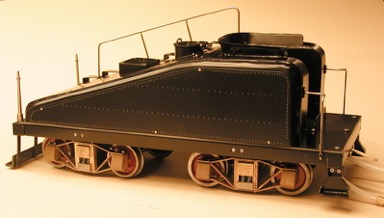
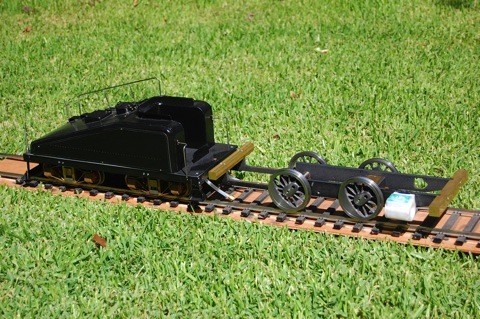
Current progress -- frame complete, tender tank being built. HO scale locomotive to show scale. Black marks on tender are from heating the copper for annealing and forming.
Building a Live Steam Locomotive with only a Sherline Lathe
So far, I'm building the locomotive with a Sherline 4000 lathe with a milling column attachment. A Sherline lathe is a bit small for a job like this. The Sherline lathe has a 3.5" "swing"; that is, it can spin a piece of at most diameter 3.5 inches around so it can be machined. The Sherline can cut steel, but generally either can't do as much work as the big machines, or has to make smaller cuts. The usual assumption is that a lathe twice the size (6" swing) and a similarly-sized milling machine would be needed. Such machines need space, and weigh at least a hundred pounds -- they're not easy to put on the workbench, and remove when I've got another project. So far, I'm getting by with my tiny lathe. Here's some of the places I've been caught. So far, there's been nothing I've been unable to do at home, but I'm certain my work isn't as precise as the folks who have the big lathes.
Machining the interior face of the wheel.
* The wheels are supposed to be turned from 2.25" steel disks. (I used 2 inch because the metal supplier didn't have larger.) Even though the Sherline lathe is supposed to be able to turn a 3.5" diameter piece, turning the wheels is hard because the crossslide won't fit under the wheel. I ended up having to adjust the cutting tool to reach over to the wheel, making the setup less rigid and the work slower. Raising the headstock might have helped.
* Part of the water pump is bored out by putting the pump body in the lathe chuck. The piece is too big for turning in the lathe; I ended up drilling out the parts with the milling column.
* Drilling holes in the tank floor and bars framing the tank couldn't be done on the mill because the floor's too big. I resorted to my power-drill for drilling the holes that secure the tank to the body. (Even worse, I did the work out in the backyard at a picnic table.) These holes came out square enough to work.
* Drilling holes in the end of the bars for the frame can't be drilled with the milling column (used as a drill press) -- there just isn't room. I tried using a hand-held power drill, but ended up with out-of-line holes that didn't work. I eventually figured out if I put a drill chuck in the lathe's headstock, and secured the bars to the lathe's crossslide, I could drill nice, square holes.
Turning the Drivers
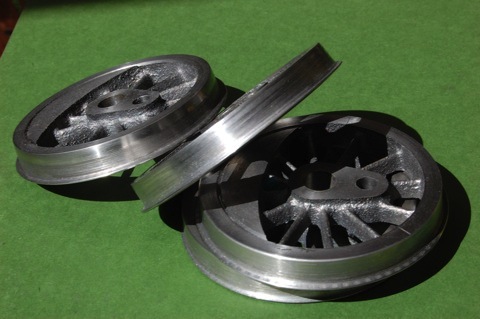
Making the drivers - the main wheels driven by the steam - on the locomotive’s a bit of a challenge. The Hiraoka book tells how to make the drivers from scratch - make a wooden form, go to local foundry, get castings made, machine castings. Luckily, Friends Models sells castings for the wheels, so I didn’t need to find my local iron foundry.
Once I had the castings, I had to figure out how to machine them. First lesson: the Sherline lathe just is too small. The castings for the drivers are larger than the swing of the lathe (about 3.6 inches diameter), and with the Sherline riser blocks, the lathe still doesn't have enough power or stability to do the job.
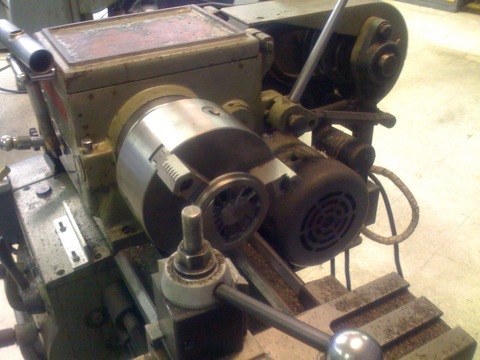
Instead, I found a membership shop that gives access to serious machining tools. TechShop in Menlo Park charges $30/day or $125/month, and lets you use a larger lathe or Bridgeport milling machine after training. They've got a ton of other machines, but these are the ones I'm most interested in.
Here's pictures of my drivers. The first photo shows the drivers in progress from the rough castings to machined faces. The second photo shows the setup on the lathe at TechShop. The final photo shows the resulting wheels.
Here, you can see the locomotive frame and wheels assembled and next to the tender. I also have machined the cylinder out of delrin so I could see whether it's possible on the Sherline and so I could practice the sequence of cuts needed to fabricate this piece.
Side Rods
Finally, here's the side rods that tie the two wheels together. Each is made from 3/4" x 1/4" 1018 steel bar. The rods are 6 inches long. The finished rod is 1/4" wide and 1/8" thick in the middle portion. (That's a lot of metal to remove!) The top one has had the holes drilled, and the top and one end shaped; the second shows a near-finished rod. I did this work on a Sherline mill.
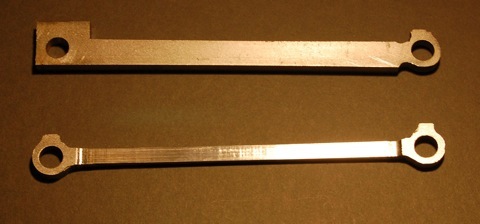
The Sherline's not really powerful enough for this sort of work; it doesn't take much to overheat the motor. For example, to scallop the sides of the rod, I made a series of 0.005" cuts with the side of a 1/4" diameter milling bit. Two or three of these cuts along the 5" of the rod was enough to overheat the motor. Doing larger or deeper cuts just overheated the mill faster. Much of the problem is working in steel. I have had less problems doing large milling work in brass. The sheer size of the cuts is also part of the problem. I really ought to learn to use the Bridgeport full size mills at TechShop to make these pieces.
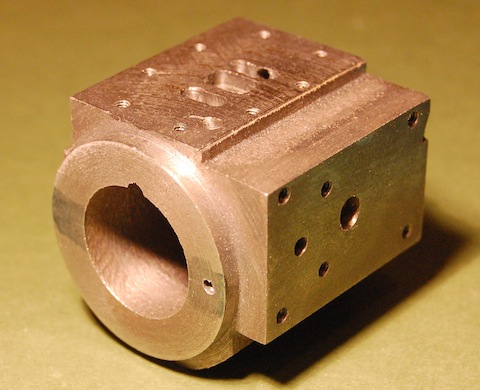
Cylinders
I’ve done a first try on machining a cylinder for the Pennsy A3. I got a pair of the cast iron cylinder castings from Friends Models; the picture below shows my progress. Unfortunately, I broke a drill bit in the first hole for the cylinder head, and had to give up on this part. I also messed up this part by machining too much off the top when first squaring up the casting. The Hiraoka book gives fine measurements for the raw stock when machining the casting from a solid block of bronze. With the already-cored casting, it’s much harder to figure out where the center for the cylinder should be, and thus guess at the outer dimensions. To do the other cylinder, I’d probably machine the top only enough to square it up, and get it to its final measurement only after I’d bored the cylinder.